Quick Reference Guide (QRG) #20
Last updated12 September 2023
Broken Safety Spring Replacement – Windshield Shade:
Issue/Problem
When operating your windshield shade, it appears to be running fine, except you hear a clicking noise when the shade is moving up and down.
Possible Cause
The most likely cause of this clicking noise is a broken safety spring inside the headrail tube (Illustration 1).

This safety spring was installed as a precaution with AMS’ first generation of tubular motors to prevent a shade from potentially unravelling into the driver’s vision in the unlikely event of a motor shaft braking.
With the introduction of a new motor generation in 2015, such spring was actually no longer needed because a special spring clutch was integrated into the tubular motor itself, taking over the function of this safety spring; for internal reason this spring, however, was only eliminatedand no longer installed from mid 2019.
A broken safety spring in a shade with new generation motor(s) is in factmore of a nuiscance than an actual problem and is having no negative effect on the proper operation of the shade; however, it nevertheless needs to be addressed as soon as possible, as your shade could still have first generation tubular motors installed, in which case safety could be compromised.
Solution
- If your shade contains 2nd generation Motors: In all cases, the safety springs in both the day and night shade mustbe removed and they do not need to be replaced; however, it requires a new bracket kit (as outlines below) to accommodate a slight space difference.
- If your shade contains 1ST generation Motors: Since such safety springs are no longer available (nor recommended), both 1st gneration motors will need to be replaced with 2nd generation motors with built-in safety clutches, even if only one spring should be broken. Such motor replacement will require a new bracket kit (see below).
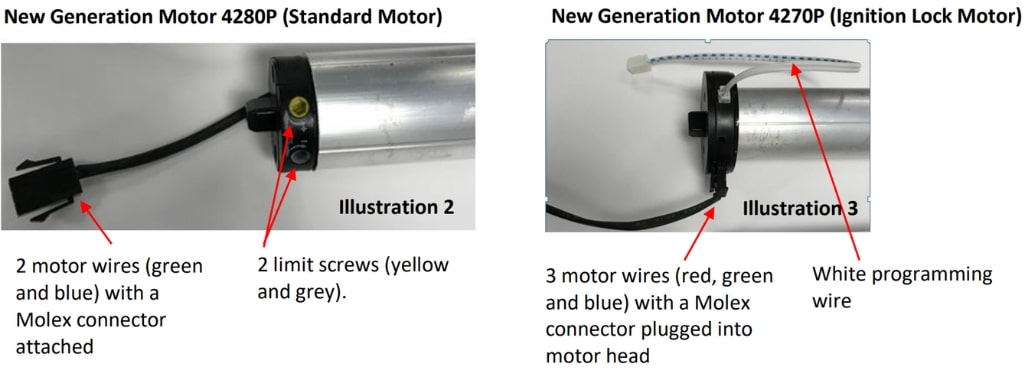
Illustrations 2 and 3 below show how you can determine whether you have new or old generation motors in your shade:

If your motor is not any of above, then your motor is old generation and both motors must be replaced with new
generation motors.
Before startingwith the replacment procedure, please order the following parts from either an authorized AMS dealer or directly from Auto-Motion Shade:
- One (1) completet Bracket Replacement Kit # HA-586R1-SUB(illustration #4) if your shade has new generation motors (see Illustration 2 and 3).
- If your shade has old generation motors, you will also need to order two new generation motors 4280P or 4270P in addition to the Bracket Replacement Kit.

Once you have received above parts, you are ready to start the removal of both springs and the replacement of the motors if required, by following the instructions below.

Removal / Replacement Instructions
- With a second person best assisting, take the entire shade down by unscrewing the mounting brackets. For further details on how to remove the shade, please refer to QRG #15-1 and QRG #15-2.
- If your motors are the old generation type, pull both motors out on the left side of the tube and replace them with new generation type motors. For details on how best to replace motors refer to QRG #17.
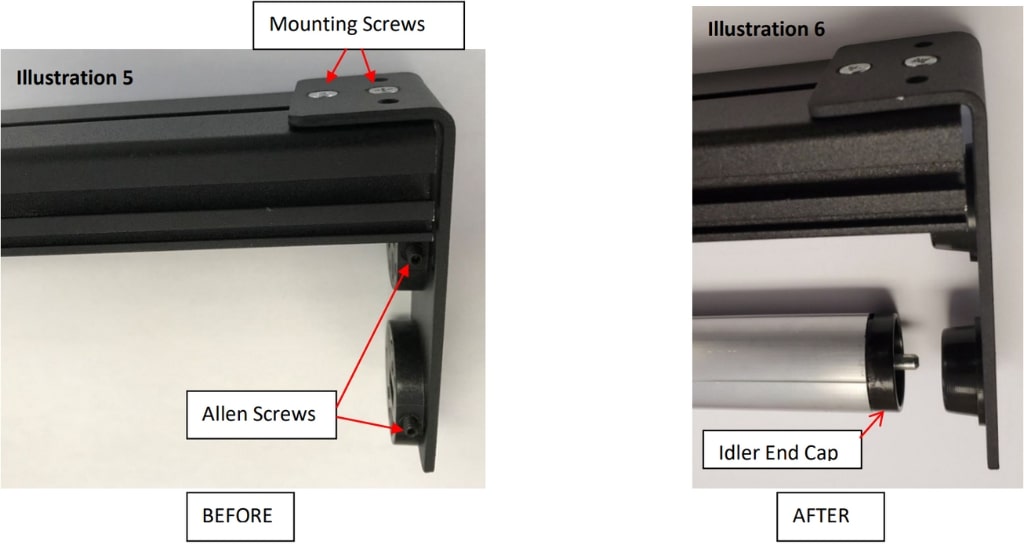
- On the right side of the tube(s), remove the angle bracket by loosening the Allen screws and mounting screws as shown on Illustration 5 above.
- Pull both spring assemblies out of their tubes and dispose of them (as shown in illustration 1 above).
- Fit the new angle bracket on top of the mountain rail, making sure that the gap between angle bracket and mounting rail is the same on left and right sides (illustration 6).
- Insert the Idler End Caps that came with the kit into the aluminium tube ends (as shown in illustration 6).
- Insert the male pins of the two Idler End Caps into their respective female nylon receptacles on the new angle bracket (Illustration 6).
- Tighten the mounting screws on the angle bracket (Illustration 6).
- Install the shade back to where it was installed before (refer to QRG #15-2).
- Adjust the upper and lower limits on both shades as they could possibly have changed. For motor(s) 4280P refer to QRG #2 and for motor(s) 4270P please refer to QRG #7-2.
- Your shades are ready for use again and should now be operating smoothly without any clicking noise.