Quick Reference Guide (QRG) #7-2
Limit SettingsLimit Settings
Last updated12 September 2023
Programming Limits for 2nd Generation Ignition-Lock Motor 4270P:
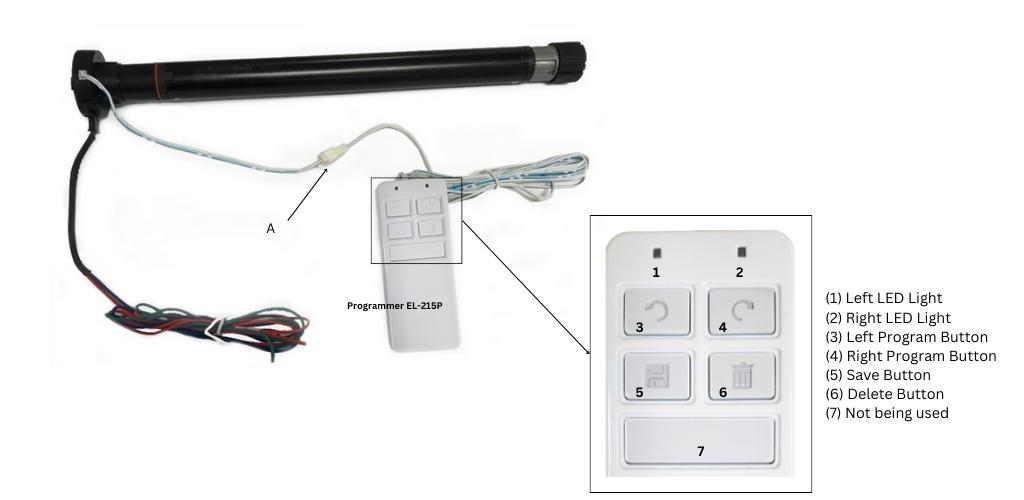
This motor has 3 wires only that are all connected to the Dash-Switch. To program the limits for Ignition-Lock Motor EL-4270P, a programmer (215P) is required as per shown below; the programmer needs to be connected to the white connector on the pig tail wire attached to the motor, as illustrated.

Note 1: Motor model 4271P (earlier version), it is the same as motor model 4270P.
Note 2: Motor has two speeds when in programming mode, with the slow one being used for fine adjustment when coming close to the desired limit (see also point no 3 below).
- Make sure the programmer has batteries inside.
- Regardless whether (dash) ignition switch position is on or off, connect the programmer and then hold the UP or DOWN button on the Dash-Switch. You will need to keep holding Dash-Switch throughout the programming until all programming steps up to #6 are completed. The left LED (1) on programmer 215P should now be ON (if not, it means there is no power to the shade or your programmer has no battery installed, in which case check the wiring).
- Press and hold either the left (3) or right (4) programming button, until the shade is about half-way up (or down). Press and hold ‘Delete’ button (6) until the right LED light (2) comes on then release the Delete button (6). All old programs are now cleared.
- Press and hold left or right programming button (3 or 4); the shade moves up until it reaches your desired top limit; if it goes too fast/slow, you can release and press the same button (3 or 4) again to switch to slower/faster speed. Once you reach to top limit, release button (3 or 4); now press and hold ‘Save’ button (5) until right LED (2) comes ON, then release it.
- Press and hold left or right programming button (3 or 4) to go down until you reach the bottom limit, then press and hold ‘Save’ button (5) until right LED (2) comes ON. Regular top and bottom shade limits are now set.
- Next, program the intermediate safety stop (Ignition Line) by pushing and holding the left/right programming button (3 or 4) again to move the shade to your desired intermediate safety stop that allows you to still safely see the road when driving while using the shade as a sun visor.
- When done, press and hold ‘Save’ button (5) until right LED (2) comes ON.
- Release the Dash-Switch you kept holding all along (see point 1).
- Disconnect the programmer by holding the connectors and not the wires (see Illustration above point A).
- Now test the end limits by operating the shade as follows:
- Ignition key is OFF: by pressing Dash-Switch Up/Down, your shade should travel all the way from top to bottom limit.
- Ignition key is ON: by pressing Dash-Switch Up/Down, your shade should only travel to Ignition Limit (see point 4 above) and should NOT travel beyond this point to prevent obstruction of your view while driving.
The programmer needs to be disconnected after the programming process is done. Never leave the programmer connected to the motor thereafter.