Quick Reference Guide (QRG) #8-2
Last updated12 September 2023
Pairing of 2nd Generation RF Transmitters with 2nd Generation RF Motor with internal RF Receiver (4285P):
![]()
Whichever of the above transmitters you select, they all work with same motor 4285P.
Please note that the new generation RF Transmitters are not backwards compatible. They only work
with the new generation of 4285P RF motors.
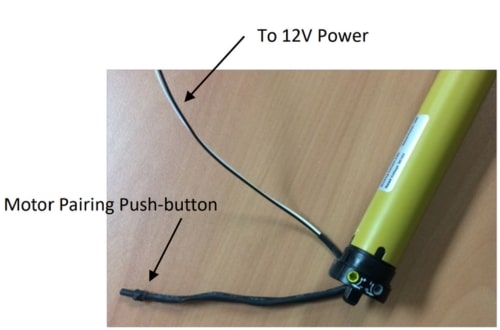
- Ensure that the Motor is connected to a 12VDC power supply (white wire to ground, black wire to 12VDC power).
- On the remote transmitter press the channel selection button that you want to pair with the shade (skip this step for single channel remote transmitters).
- Press the pushbutton located at the end of the short 6” programming wire on the motor (see above illustration) until the shade jiggles (moves back and forth), then release it.
- On the remote transmitter, press and hold the pair button hole on the back of remote for two seconds (on transmitter EL-213P “SET” appears on the display), then release it.
- Immediately, press the stop button on the remote transmitter and release it.
- Your shade jiggles again to confirm and now is paired with the transmitter.
Please note that if you wait too long in between pressing the buttons as indicated above, the motor will time out and will jiggle by itself to show that it came out of programming mode.
Note 1
To clear or un-pair a single channel on the remote, first select that channel on the remote transmitter, then press and hold the pair button hole on back of remote for a few second(on transmitter EL-213P “SET” appears on the display), then press “down” button on front of remote. Now only that single channel is cleared from the remote. (This procedure only clears that single channel from the remote).
Note 2
To reverse direction, press and hold the pair button hole on the back of the remote transmitter for two second(on transmitter EL-213P “SET” appears on the display), then release it and press “up” button on remote.