Quick Reference Guide (QRG) #7-3
Limit SettingsLimit Settings
Last updated12 September 2023
Programming Limits of Heavy-Duty Motor 4300P
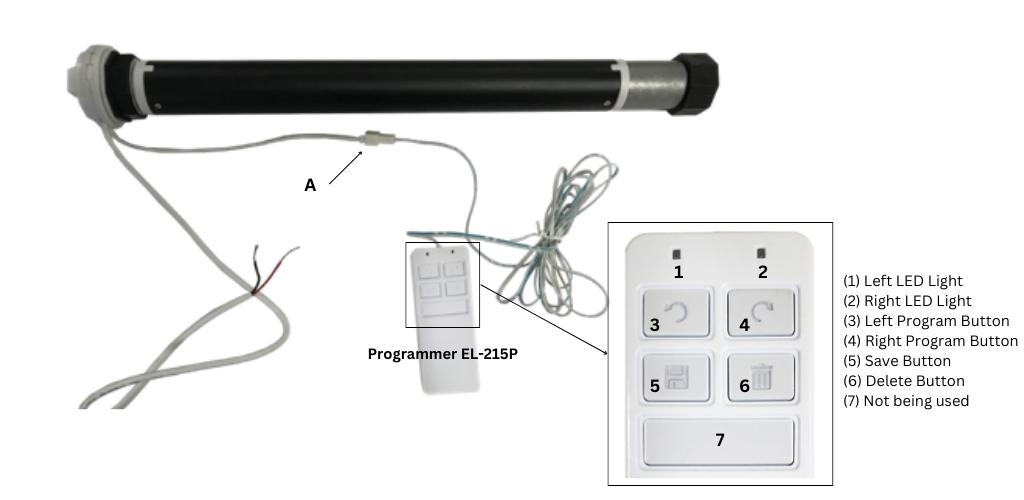
This motor has 2 wires only that are all connected to the Dash-Switch. It also has a white pig tail wire with a connector attached to it. The purpose of this pig tail wire is to program the limits. The end positions of the shade have been pre-set at the factory and they should not need to be re-adjusted. However, if you wish to set different end positions, a programmer (215P) is required as shown below. The connector (A) at the end of the white pigtail cable on the motor needs to be connected with the cable on the programmer and the limits can then be programmed as outlined below.
Important: the programmer needs to be disconnected again after the limits have been set.
- Make sure the programmer 215P has the batteries installed.
- Connectthe programmer and then hold the UP or DOWNbutton on the Dash-Switch. You will need to keep holding the Dash-Switch throughout the programming process until all programming steps up to #6 are completed. The left LED light (1) on the programmer 215P should now be ON (if not, it means there is no power to the shade, in which case please check the wiring or your programmer has no batteries installed).
- Press and hold either the left (3) or right (4) programming button until the shade is about half-way up (or down). Press and hold ‘Delete’ button (6) until the right LED light (2) comes on then release the ‘Delete’ button (6). All old programs are now cleared.
- Press and hold again either the left or the right programming button (3 or 4); the shade moves up until it reaches your desired top limit; if it goes too fast/slow, you can release and press the same button (3 or 4) again to switch to a slower/faster speed. Once you reach the top limit, release button (3 or 4). Now press and hold the ‘Save’ button (5) until the right LED light (2) comes ON, then release it.
- Now press and hold again the left or right programming button (3 or 4) and move the shade down until you reach the desired bottom position, then press and hold the ‘Save’ button (5) until the right LED light (2) comes on. The desired top and bottom shade positions have now been set.
- Release the Dash-Switch that you have been holding down all along.
- Disconnect the programmer from the white motor pig tail wire by holding the connectors and not the wires (see Illustration above (A).
- Finally, check the end positions by operating the shade up and down by means of the dash switch.
The programmer needs to be disconnected after the programming process is finished. Never leave the programmer connected to the motor!