Quick Reference Guide (QRG) # 24
Last updated12 September 2023
Spring Replacement on Manual DRS (Double Roller) or SRS (Single Roller) House Shades
This manual will guide you through the process of replacing a spring in a Manual DRS (Double Roller Shade) or Manual SRS (Single Roller Shade) in your vehicle’s living area. The shade unit needs to be removed for this process.
Please note that on some rollers the fabric might roll to the back (standard roll-up) whereas on some other ones the fabric might roll to the front (reverse roll-up). With standard roll-up the spring will always be located on the left side whereas on reverse roll-up the spring will be positioned on the right side. In both cases, the spring replacement instructions as per below remain the same.
In the following pictures we show how to replace the spring in a manual DRS shade with both fabrics as a standard rollup. If your situation is different, the below instructions will still apply. Please note that this QRG is NOT applicable to trapezoid Manual Shades.
- Order the replacement spring. Different springs are being used for different widths of shades, as listed below; please make sure you order the appropriate spring for your shade:
- 13” – 16” wide: Spring # HA-000731 (32 mm 1.1 x 120 mm)
- 17” – 19” wide: Spring # HA-000730 (32 mm 1.1 x 160 mm)
- 20” – 22” wide: Spring # HA-000729 (32 mm 1.1 x 200 mm)
- 23” – 49” wide: Spring # HA-000726 (32 mm 1.1 x 260 mm)
- 50” – 59” wide: Spring # HA-000727 (32 mm 1.2 x 400 mm)
- 60” and up: Spring # HA-000795 (32 mm 1.5 x 400 mm)
- Remove the mounting rail with the shade assembly, which is installed to the ceiling by means of spring clips that hold the mounting rail firmly in place. We refer to this type of mounting as “Click-Ease System”. While holding the shade assembly, push the tabs on the front of the spring clips upwards, which will release the mounting rail. Release the clips one by one while holding the assembly to prevent it from falling down.

- Put the shade down on a flat surface with the front side of the shade facing you. Pull both shades down a bit as shown until you feel that both are in a locked position.

- Loosen the two bracket set screws on top of the mounting rail (preferrably on the right side of the shade) and pull the bracket out of the mounting rail.


- Remove the roller where you want to replace the spring as shown. Make sure when you lay the roller down that the fabric is rolling up from the back. If not, turn the roller around to look like the image below.
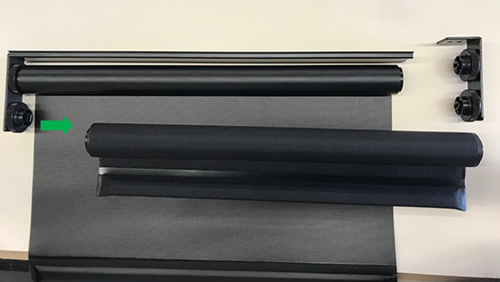.jpg "Image-5-(1).jpg")
- Using a pair of pliers, grab the square spring shaft and pull the defective spring out of the tube as shown.
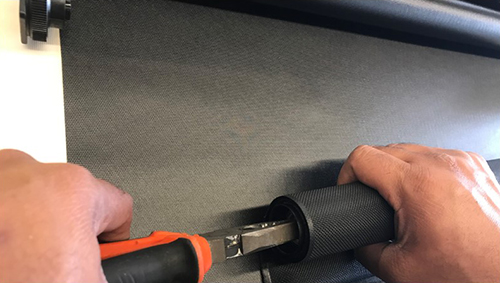.jpg "Image-6-(3).jpg")
.jpg "Image-7-(1).jpg")
.jpg "Image-8-(1).jpg")
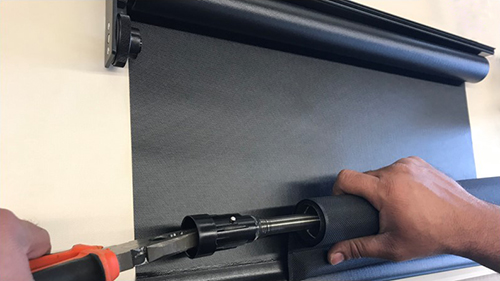
- Insert the new spring into the tube. Make sure that all parts shown by the arrows are properly aligned.


- When inserting the head of spring assembly, you will notice that only one of the slots has no lug in it. Align this slot with the aluminum tube as shown on the following images.


- Now that spring is completely inserted into the tube, roll the fabric around tube completely as shown.

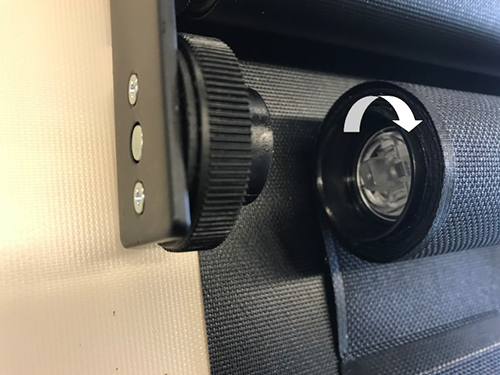
- Using a locking plier, grab the square shaft of the spring and turn the spring CW (clockwise) for the number of turns indicated below; please note that this represents a basic tensioning of the spring only and once the roller is back in its assembly you will be able to turn the spring adjusting wheel to further fine-tune the tension if necessary.
- 13” – 16” wide: Spring # HA-000731 (32 mm 1.1 x 120 mm) 6 turns
- 17” – 19” wide: Spring # HA-000730 (32 mm 1.1 x 160 mm) 8 turns
- 20” – 22” wide: Spring # HA-000729 (32 mm 1.1 x 200 mm) 10-12 turns
- 23” – 49” wide: Spring # HA-000726 (32 mm 1.1 x 260 mm) 18-20 turns
- 50” – 59” wide: Spring # HA-000727 (32 mm 1.2 x 400 mm) 22 turns
- 60” and up: Spring # HA-000795 (32 mm 1.5 x 400 mm) 9-10 turns
- Important: After the last turn, wiggle a little back and forth to make sure that the spring is locked.
.jpg "Image-15-(1).jpg")
- Align the square spring shaft with the bracket opening on the left side of the shade.
Important: If on this roller the fabric is supposed to roll from front (i.e. reverse roll-up), turn the roller around and align the other side of roller with this bracket on the left side. - Now align the right side bracket openings with both rollers as shown and carefully push the bracket back into the mounting rail.

- Tighten the two set screws on the right bracket.

- Install the shade back to the ceiling in reverse order as explained in step 1.
- To fine tune the spring tension, follow QRG# 23 “Tension Adjustment Procedure”.