Quick Reference Guide (QRG) #13
Last updated12 September 2023
Pairing of 2nd Generation RF Transmitters with Double shafted Motor 4240N, using external RF Receiver Module 216P:
![]()
![]()
Important: on the back of each transmitter you will find a small hole with a micro push button switch behind, used for the pairing with Module 216P (see pairing instructions below).
All above transmitters will work with Motor 4240N in conjunction with Module 216P.
Please note that 1st and 2nd generation RF Transmitters are not interchangeable; the external Module 216P only works with 2nd generation RF Transmitters.
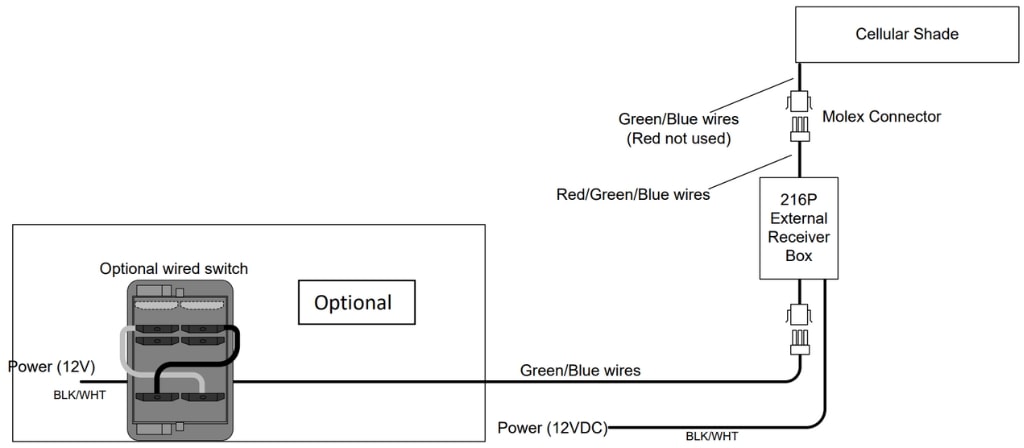
Special Feature: Module 216P gives you the option to control a motor both remotely with an RF transmitter and by means of a wall switch.
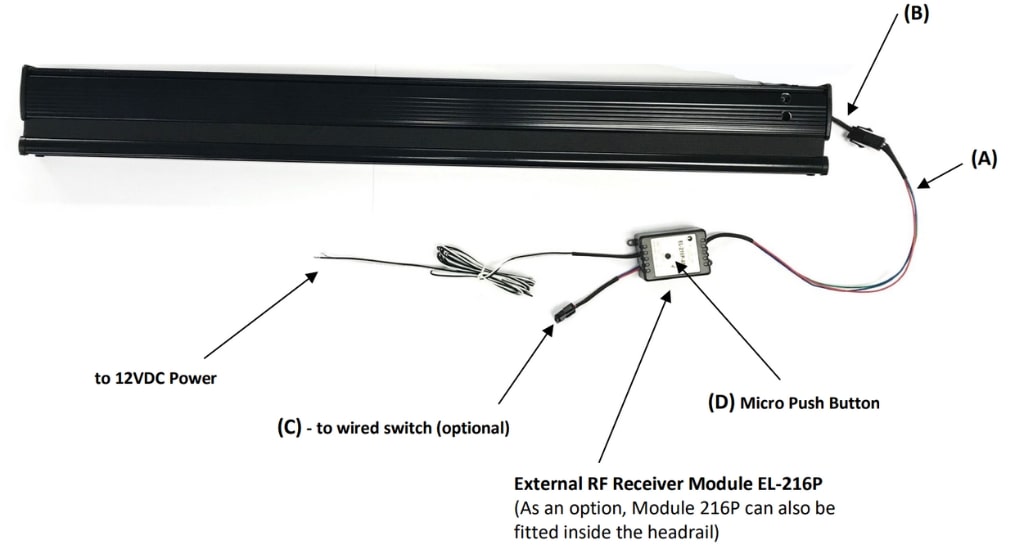
- Connect the Module output wire (A) to the short Shade power wire (B); if wired switch control is desired, connect the wire coming from the wall switch that controls the shade to Module wire (C). This wire can be left unused if no hardwired wall switch control is needed.
- Ensure the Module is connected to a 12V DC power supply (white wire to ground, black wire to 12V power). A green light on the Module must be lit. If you do not see a solid green light, the Module is either not properly powered or the Module may be faulty.
- On the RF Transmitter, select the channel you want to program by pressing the button of that channel.
- On the Receiver Module, press the small micro push button (D) with a ball pen point and hold until the color of the light changes from green to red; now release it and immediately without delay press and hold the micro push button inside the small hole on the back of the transmitter (using e.g. a paper clip) for few seconds (on transmitter EL-213P “SET” appears on the display), then release it and immediately press the stop button on the front of the transmitter.
Note 1
To clear or un-pair a single channel on the remote, first select that channel on the remote transmitter, then press and hold the pair button hole on back of remote for a few second (on transmitter EL-213P “SET” appears on the display), then press “down” button on front of remote. Now only that single channel is cleared from the remote. (This procedure only clears that single channel from the remote).
Note 2
To reverse direction, press and hold the pair button hole on the back of the remote transmitter for two second (on transmitter EL-213P “SET” appears on the display), then release it and press “up” button on remote.
Wiring Diagram